Service

Home
Service
Company SmartFactory Product Service IR
FAQ
Service Center Download Technical Support FAQ
Smart HMI
Smart HMI Smart SCADA Smart DEVICE Smart Factory Solution
We will do our best to satisfy our customers.
Service Center Download Technical Support FAQ
FAQ
Smart HMI
Q.
[R Series] _1OFF Error After Conversion to TDS
Product
A.
An error may occur in TOP Design Studio (TDS) after conversion due to changes and upgrades in functionality. We apologize for the inconvenience.
 
The special address [_1OFF], which was available in XDesignerPlus, is no longer supported in TOP Design Studio, and therefore causes a build error.
 
To resolve this issue, please change _1OFF to another valid address (PLC or SYS).
 
For detailed instructions on how to modify the address, please refer to the attached manual.
is the problem solved? View More
Q.
[R Series] VNC (Remote Monitoring/Control) and FTP (Remote File Transfer)
Product
A.
1. VNC (Virtual Network Computing)
 
VNC allows you to monitor and control the screen of a TOP configured as a VNC Server from another TOP, mobile device, or PC.
The VNC Viewer is the application that enables remote access to the screen of a TOP running the VNC Server.
 
To use the VNC function, an Ethernet network connection is required:
 
-. Local Ethernet Network: A PC with an IP address in the same network range as the TOP can connect via VNC. Mobile devices can also connect using a wireless router’s Wi-Fi.
-. Public IP Network: Any PC with internet access can connect.
-. Multiple Connections: Several VNC Viewers can connect to the same VNC Server simultaneously.
-. Dual Functionality: A TOP can operate as both a VNC Server and a VNC Viewer (Client).
 
※ Note: VNC is supported on TOPR, TOPRX, TOPRW, and TOPRH models.
 
 
2. FTP (File Transfer Protocol)
 
FTP is a protocol based on TCP/IP that enables file transfer between a server and a client. Through an Ethernet network, files on the server can be shared and retrieved.
A TOP can operate as both an FTP Server and an FTP Client.
 
For detailed setup instructions, please refer to the attached manual.
is the problem solved? View More
Q.
[R Product] How to Connect Multiple TOP HMIs (N:1) to a Single PLC via MBUS
Product
A.
When a PLC is already connected to one TOP via serial (RS-232C/RS-422/RS-485) and you want to add additional TOP units without changing the PLC wiring, use MBUS.
 
 
What is MBUS?
MBUS enables N:1 communication—one controller (PLC) over serial, shared by multiple TOP HMIs via Ethernet—with simple configuration.

-. The first TOP that is physically connected to the PLC over serial is the [MBUS Server].
-. The additional TOP units (2nd, 3rd, 4th, …) connect to the Server over Ethernet and act as [MBUS Client].
-. There is no hard limit on the number of Clients, but performance decreases as more are added. We recommend 4 or fewer Clients for stable speed.
 
 
Project Compatibility
As long as the PLC model/settings selected in TDS ([Project] - [Property]) are the same across the TOP projects, MBUS will work.
 
The projects do not need to be identical in every detail.
 
 
Configuration Steps
 
A. MBUS Server (TOP #1 connected to the PLC via serial)
1. On the TOP HMI, open the menu: [Control Panel] - [Service] - [MBUS]
    (Use the Exit button on the top menu to reach the TOP menu screen.)
2. Enable [Use MBUS Server].
3. Select and configure the serial port that communicates with the PLC.
 
[Figure. MBUS Server]

B. MBUS Clients (TOP #2, #3, #4, … over Ethernet)
1. On each Client TOP, go to [Control Panel] - [Service] - [MBUS].
2. Enable [Use MBUS Client].
3. Enter the IP address of the MBUS Server (TOP #1).
 
[Figure. MBUS Client]


Notes
-. TOP-VIEW does not support MBUS.
-. Clients communicate with the PLC through the MBUS Server over Ethernet; the PLC remains connected only to the Server via serial.
-. For best performance, keep Client count ≤ 4. (More clients, lower speed)
is the problem solved? View More
Q.
[R Product] When the OK/Cancel Buttons Are Not Visible in the Connect Setting Window (TOP - PC)
Product
A.
 
This issue occurs due to a DPI compatibility problem in the program settings.
 
Solution:
1. Right-click on the TDS shortcut and select [Properties].
2, Go to the [Compatibility] tab and click [Change high DPI settings].
3. Check "Override high DPI scaling behavior".
4. From the dropdown, select "Application".
After applying these settings, the OK/Cancel buttons will appear correctly.
 
is the problem solved? View More
Q.
[R Product] How to Back Up Alarm Data to an SD Card
Product
A.
This guide explains how to back up alarm data stored in the TOP unit to an SD card.
 

1. Alarm Data Storage in TOP Unit
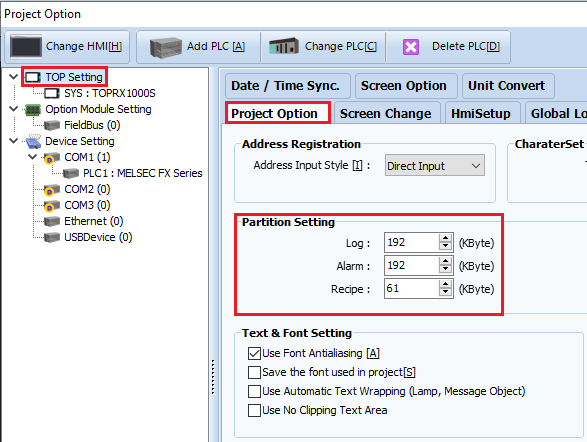
The backup memory in the TOP unit stores Log, Alarm, and Recipe data.
 
-. Capacity: Fixed at 512 KB (not expandable).
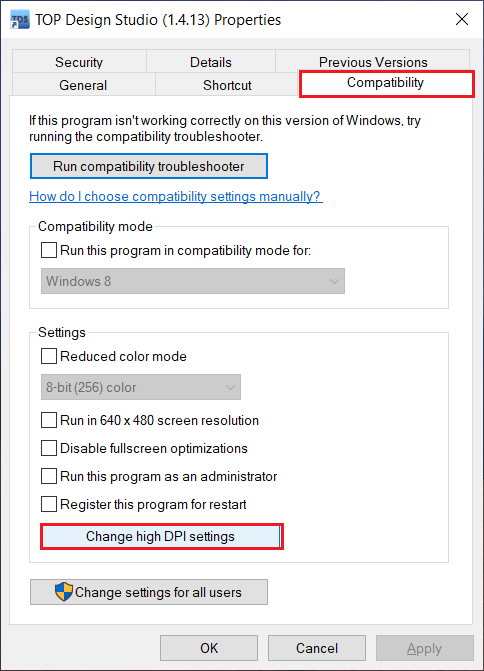
-. The memory allocation for alarms can be adjusted under: [Project] - [Property] - [Project Option] (Window) - [TOP Setting] - [Project Option] (Tab)- [Partition Setting].
-. Adjust the allocation according to the memory requirements of Log/Alarm/Recipe data.
 
 
If more storage is needed beyond the built-in memory, you can back up data using:
-. An SD Card, or
-. An optional module (TOPR_OPT_CAM32).
The TOPR_OPT_CAM32 accessory can be found on the website under: [Product] - [Smart HMI] - [ACCESSORY].


2. Backup Settings in TOP Design Studio
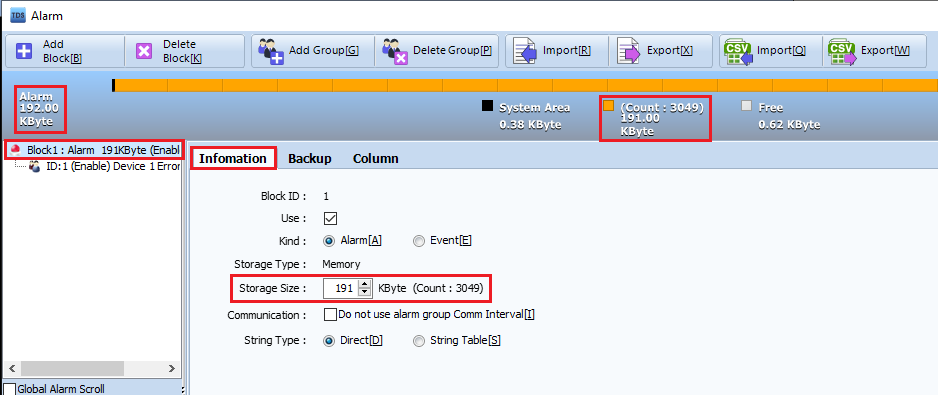
Alarm Backup settings are configured in: [Project] - [Alarm].
 
 
-. In the alarm screen, select a specific [Block] from the list on the left.
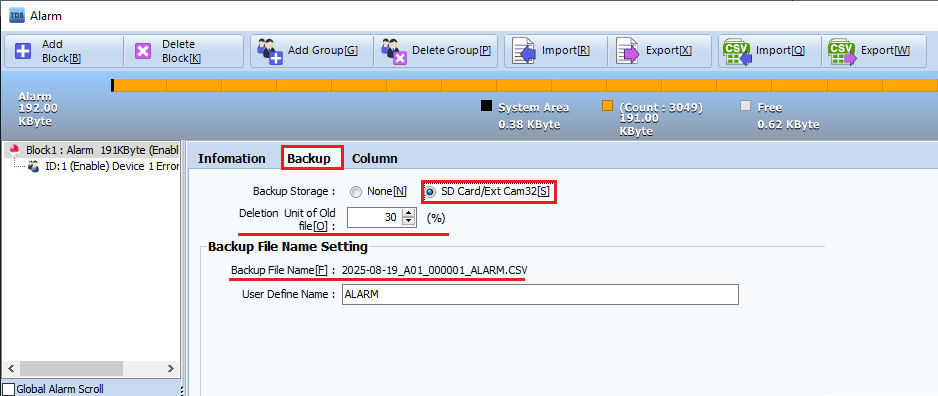
-. On the right, under [Information], you can check the [Storage Size].
-. The [Count] field shows the approximate number of alarms that can be stored in the TOP unit.
   Ex) With 191 KB allocated, about 3,049 alarms can be stored.
※ Note: The actual number may vary depending on alarm messages and additional information.


3. Backup to SD Card
 
To back up alarms to an SD card:
1. In the [Backup] settings, set [Backup Storage] to [SD Card/Ext Cam32].
2. Configure [Deletion Unit of Old File].
 
 
When the alarm storage reaches capacity, the oldest 30% of alarm data is copied to the SD card as a CSV file, then deleted from the TOP unit.
 
-. CSV files can be opened in Excel.
-. File path : [HMIAlarmBlock1 (Block No.)]
-. File name : [2025-08-19 (Date)]_[A01 (Block No.)]_[000001 (File No.)]_ALARM (Custom File Name).CSV
※ If a CSV file for the same date already exists, new data is appended instead of creating a new file.


4. Notes on Backup Behavior
-. If [Backup Storage] is set to [None], backup will not occur.
-. When memory is full:
   - The system deletes the oldest cleared alarm first, then saves the new alarm.
   - If no cleared alarms exist, the oldest active alarm first, then saves the new alarm.


5. [SD Update Action]
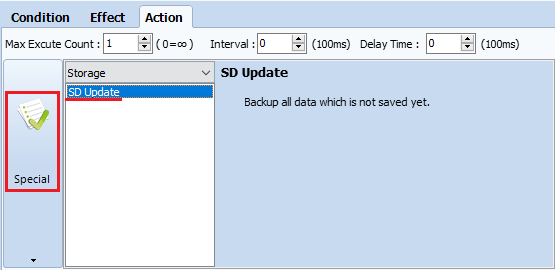
If you remove the SD card and want to copy all remaining alarm data from the TOP unit:
-. Use [Effect & Action] - [Action] - [Special] - [Storage] - [SD Update].
 
 
This will:
-. Copy all alarm data from the TOP unit to the SD card.
-. Generate CSV files by date.
-. If a CSV file for the same date already exists, new data is appended.
-. After copying, the alarm data in the TOP unit is deleted.


6. SD Card Specifications
-. Recommended capacity: 32 GB or less
-. File system: FAT32 format
is the problem solved? View More
Q.
How to Check the Software Used for Uploading
Product
A.
Regarding XDesignerPlus and Older Software, when uploading, you need to confirm the HMI model and its OS version.
Go to [Service] - [Download] - [Software], and click on each software to see the supported OS versions and HMI models.

1. TOPR Series
For the R series, the software used is TOPDesignStudio.
For detailed upload instructions, please refer to the FAQ: "[R Series] Project File (Screen Data) Upload/Download Method."
 
2. XTOP / ATOP Series
For XTOP and ATOP models, you must check the HMI OS version.
On the HMI menu screen, go to "Information" or "System Information" to find the OS version.
 
 
Use the corresponding software based on the OS version:
-. OS V2.3 → TOP-Designer V2.3
-. OS V2.4 → XTOP-Designer V2.4
-. OS V3.1 → XDesignPlus V2.6.58
-. OS V4.X → XDesignPlus V4.8.31
is the problem solved? View More
Q.
[R Product] How to Resolve the “At least 1 Administrator account should be registered” Popup
Product
A.
 
This error popup appears when the security level is enabled but no administrator account has been selected.
 
Solution:
Go to [Project] - [Security], and in the security level list, check at least one box under Administrator.
Once an administrator account is selected, the error will be resolved.
 
is the problem solved? View More
Q.
[R Series] How to Communicate with Controllers Not Listed in the PLC List
Product
A.

If the controller you are using is not included in the supported PLC list, you can still establish communication as follows:


1. Using Modbus Protocol
  - If the controller supports the Modbus protocol, communication can be established via Modbus.
 
2. Using M2I Custom Protocols
  - In Manufacturer: select M2I Corporation.
  - In Model: choose TOP Master/TOP Slave/User Define Protocol depending on your communication requirements.
is the problem solved? View More
Q.
[XTOP] “Initialize Logging and Recipe?” Message
Product
A.
This message appears when the battery inside the XTOP device has discharged while the power was turned off.

[What to Do]
1. Press [Yes] to initialize.
  - This will clear (delete) all Logging and Recipe data.
  - The device will then proceed to the operation screen, allowing you to continue using it.
 
2. Since the battery has reached the end of its life and can no longer reliably store data, contact our Customer Service to have the battery replaced.

[Additional Information]
For more details on battery replacement timing and testing methods, refer to the [Frequently Asked Questions] section,
specifically [XTOP Product Troubleshooting Guide] Battery Replacement Timing and Testing Method].
is the problem solved? View More
Q.
[TOPR Premium] How to Transfer Project Files via Wireless Wi-Fi
Product
A.

The wireless Wi-Fi feature is supported on TOPR Premium models and TOPRH wireless models.
In other words, this function is available when using the TOPRP20 or TOPRH0700WD-W.

 
For detailed instructions on PC and TOP Wi-Fi configuration and project file transfer via Wi-Fi, please refer to the attached manual.
is the problem solved? View More
1 2 3 4 5

This site is not supported by the current browser. Please download and use another browser below.