Service

Home
Service
Company SmartFactory Product Service IR
FAQ
Service Center Download Technical Support FAQ
Smart HMI
Smart HMI Smart SCADA Smart DEVICE Smart Factory Solution
We will do our best to satisfy our customers.
Service Center Download Technical Support FAQ
FAQ
Smart HMI
Q.
[R series Fault Diagnosis Guide] COM2 RS-422 Port Test Method
Product
A.
1. Short Pin No.1 and Pin No.6 (RDA–SDA) and Pin No.4 and Pin No.9 (RDB–SDB) on the COM1/COM2 connector using a clip or jumper wire. Then, access the [Control Panel] from the menu screen.
2. In the [Control Panel], select the [Serial] menu.
3. When the [Serial] window appears, select COM1 or COM2, set the signal level to RS-422, and run the port diagnosis.
4. The Serial Diagnotic window will pop up. If you see [COM2, RS-422: communication, OK], the port is functioning normally.
5. If you have properly shorted the pins but still see [COM2, RS-422: communication, Error], this indicates a potential hardware issue with the port. In this case, please contact our customer support center for service.
 
Note:
[Port Diagnosis] function is different from the [PLC Communication Diagnosis].
[Port diagnosis] is a loopback test that checks whether the hardware port itself is working properly.
To perform a communication test (Diagnostic) with the PLC, go to [Control Panel - PLC] in the menu.
For detailed information on cable wiring and communication settings with PLCs, please refer to the [Comm Manual].
is the problem solved? View More
Q.
[R Product] How to Transfer a Project (Screen) File
Product
A.
The procedure for transferring a project file is the same for all TOP series models: TOPR, TOPRX, TOPRW, TOPRE, and TOPRH. 
 
 
1. Install TOP Design Studio
Download TOP Design Studio from the website under [Service] - [Download] - [Software], and install it on your PC.
 
2. Open the Project File
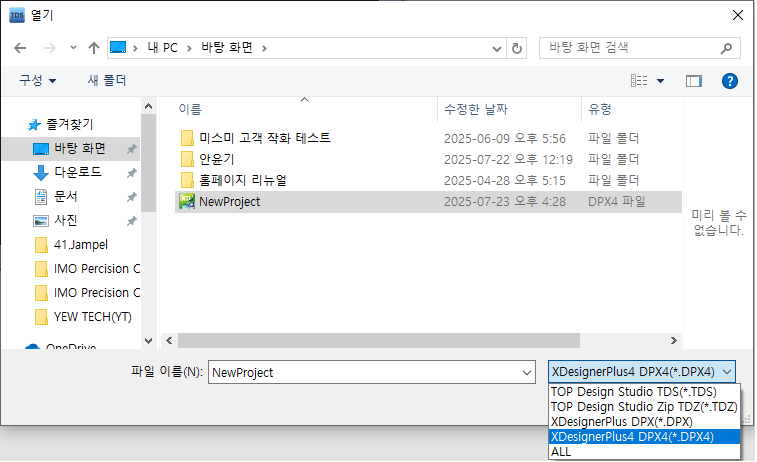
Launch TOP Design Studio and open the project file with a .TDS extension via [File] - [Open].
 
3. Connect the PC to the HMI
Connect your PC to the TOP unit using either an Ethernet or USB cable.
1) For Ethernet communication: Connect the Ethernet cable, and configure the IP settings on both the PC and the TOP unit.
2) For USB communication: Connect a USB cable to the mini/micro 5-pin port on the front of the TOP unit.

4. Build and Transfer the Project
Press F9 or go to [Trans] - [Full Build & Transfer].
- The "Build" process compiles the project and generates the transfer file (.HBZ).
- If the message "BUILD SUCCESS" appears at the bottom, the file is ready to be transferred.
- If you see "BUILD FAILURE", the transfer cannot proceed:
  - Open the [Error & Warning] page, or
  - Close the [Project Build Dialog] to view the error list at the bottom.
  - Correct all listed errors before retrying.


5. Select the Connection Method (First-Time Only)
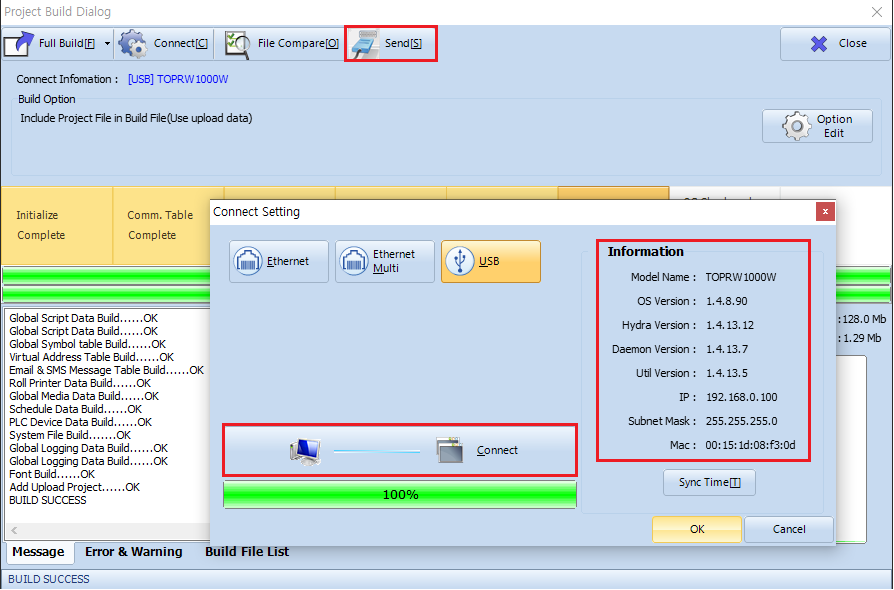
The first time you transfer a project, the [Connection Setting] window will appear.
1) For USB: Select USB and click Connect.
 
2) For Ethernet: Select the appropriate PC's IP (Bind IP) address and click Connect.
Once the connection is established, [Infomation] will be displayed. Click "OK" to continue.
From the second transfer onward, the system will remember your last-used connection method and apply it automatically.
 
6. Start the Transfer
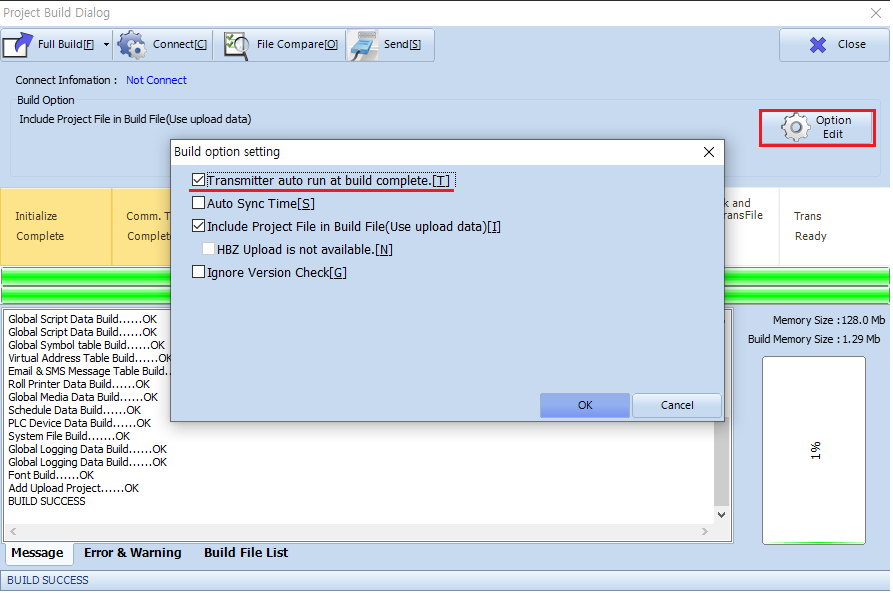
In the [Project Build Dialog] window, click the [Send] button at the top to begin.
- The existing project on the TOP device will be deleted and replaced with the new one.
- To automatically launch the transfer after each build, enable [Transmitter auto run at build complete].
- After the transfer is complete, the TOP unit will automatically reboot.
 
7. Verify the Project on the HMI
After reboot, switch to Run Mode to view the project.
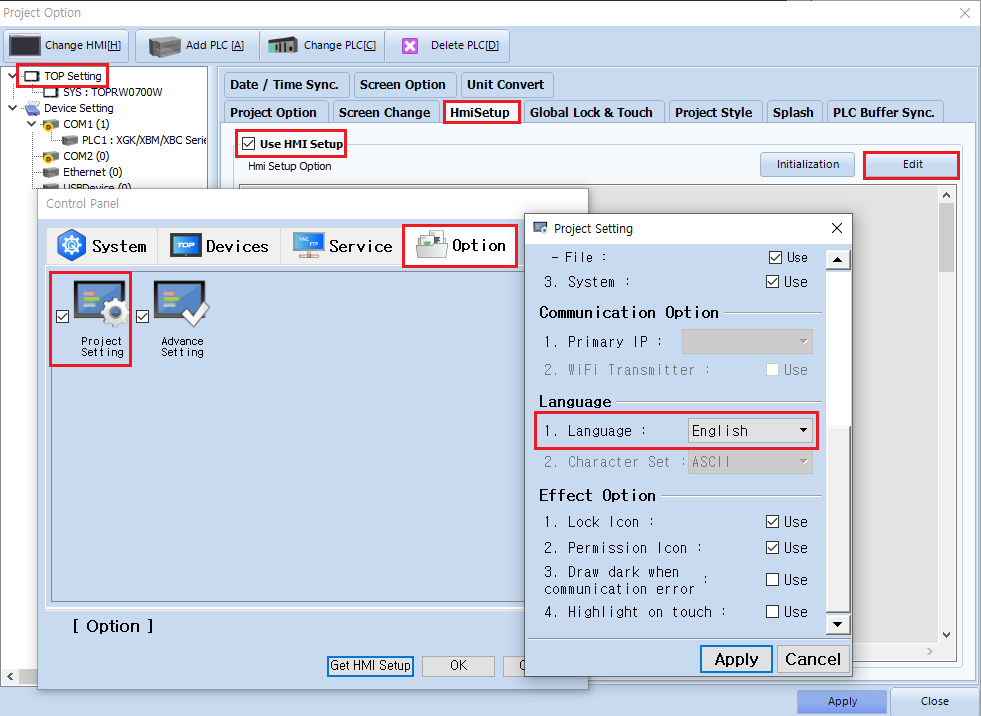
To have the HMI start directly in Run Mode when powered on:
- Go to [Control Panel] - [Project Setting].
- Set Start Mode to [Run].
is the problem solved? View More
Q.
[R Product] Recipe (String Parameter) Not Displayed in String Object After Conversion
Product
A.
After converting the [R Product] project, recipe (string parameter) values are not displayed in the string object.
 
To display recipe data in a string object in TOP Design Studio, you must set the data type to ASCII under [Project] - [Recipe] menu.
 
Please follow the steps below to configure this properly:

1. Configure the Recipe Settings
- Go to [Project] - [Recipe].
- In the [Recipe Data] page, change [Address Type] to NonSequential.
- For the first parameter (Param1), change the Data Type from DEC to ASCII, and enter the number of characters to be displayed.
- Starting from Param2, adjust the address so it does not overlap with the address range used by Param1.
 
Note:
Each a 16-bit word holds 2 characters, so 8 characters require 4 words.
For example, if Param1 uses D0 to D3, then Param2 should start from D4.
 
 
2. Configure the String Object
- Open the string object and find "Recipe1" in the address list.
- Set the item number to the parameter you want to display.
- The parameter number is fixed to Param1 and cannot be changed.
 
is the problem solved? View More
Q.
[R Series] Converting XTOP Files to R Series files Format
Product
A.
The R Series (TOPR / TOPRX / TOPRW / TOPRE / TOPRH) uses TOP Design Studio (TDS) software. Files created in TDS have the .tds extension.
 
Discontinued XTOP products used one of the following three software tools:
* XDesignerPlus V4: Files with .dpx4 extension
* XDesignerPlus V2: Files with .dpx extension
* XTOP-Designer: Files with .xop extension
 
1. For .dpx or .dpx4 Files
To convert these files in TOP Design Studio:
1) Open TOP Design Studio and go to [File] - [Open].
2) In the file dialog, set the file type to .dpx or .dpx4 and select your file.
3) After the file loads, a model selection window will appear.
 

4) Choose your new R Series model from the list and click OK.
5) The file will be automatically converted to the TDS format and saved as a new file.
 

2. For .xop Files
To convert .xop files:
1) Install XDesignerPlus V2 or V4.
2) Locate and run the converter tool [XDPConvertor.exe], which is usually found in: [C:Program Files (x86)M2I CorpXDesignerPlus4]
3) Use this tool to convert .xop files into .dpx format.
4) Then, follow the steps in Section 1 to convert the .dpx file using TOP Design Studio.
 
is the problem solved? View More
Q.
[R Product] TOP Device Menu Changes to English After Project Download (HMI Setup)
Product
A.
This occurs because the project is using [HmiSetup], and the language within those settings is configured to English.
 
How to Resolve
1. Open the project in TOP Design Studio, then go to [Project] - [Property].
2. In the [Project Options] window, navigate to [TOP Setting] - [HmiSetup].
3. Check [Use HMI Setup], then click [Edit] to open the [Control Panel].
This control panel mirrors the one found on the physical TOP device.
 
When [Use HMI Setup] is enabled, the configuration in this panel is applied to the TOP device during project download.
 
4. To change the language, go to [Option] - [Project Setting] and modify the language setting as needed.
 
is the problem solved? View More
Q.
[R Product] Lock Function When Using Switch and Key Display Objects
Function/Development
A.

When operating switch and key display objects, you can set conditions to allow operation only when those conditions are met. This feature is called the interlock (lock) function.

1. Interlock Function for Switch Objects

From the top [Object] menu, you can apply interlock settings to the following types under [Lamp]:
Touch, Momentary, Bit Switch, Selector Switch, Screen Change, Custom.
These are configured in the [Touch Options] page of the object's properties.

In the [Touch Options] page, check [Interlock] and set the operation condition.
When the screen is touched to operate the object, it will only function if the specified condition is met.
If the condition is not satisfied, the object will not operate and a lock icon (LOCK) will be displayed.

2. Interlock Function for Numeric/String Key Display Objects

For numeric and string key display objects, the interlock function can be set on the [Input] page within the property screen.

Input is allowed only if the interlock condition is met.
If the condition is not met, input will not be permitted, and a lock icon (LOCK) will be displayed.

is the problem solved? View More
Q.
[R Product] How to Capture the TOP Screen
Function/Development
A.

1. How to Capture the TOP Screen Onsite

You can capture the screen by using the screenshot menu on the TOP device.
On the TOP screen, pull down the top menu to find the [Capture] option.
To display the top menu, press and hold outside the top edge of the screen, then swipe downwards.

When you run the [Capture] menu, the following screen will appear:
Select the storage location—SYSTEM (TOP)USB (memory), or SD (card)—by pressing the first button.
When you press the middle button, it captures the entire current operation screen and saves it as a file.

If the storage medium is set to TOP, you can find the file in the [ScreenCapture] folder via the File Explorer.
If the storage medium is a USB memory or SD card, it is saved in the [HMI]-[ScreenCapture] folder.

2. How to Capture an Edited Screen in TOP Design Studio

From the top menu, run [Preview Screen] from the [Tools] menu.
Select the screen to be captured from the list, then click the [Save Image] button to save the screen image as a BMP file to the specified path.

is the problem solved? View More
Q.
[R Product] Switching TOP Screens Using PLC Address Values
Product
A.
Instead of switching TOP screens via object actions on the HMI, you can configure the screen change function based on PLC address values.
Follow the steps below to set up this feature:

1. Open the project file in TOP Design Studio, then go to [Project] - [Property] from the TOP menu.
2. In the [Project Option] window, navigate to [TOP Setting] - [Screen Change].
3. Check [Use Screen Change], then configure the [Write Screen Num (HMI->PLC)] and [Read Screen Num (HMI<-PLC)].
 
 
# Write Screen Num (HMI->PLC)
This function writes the current screen number from the HMI to the specified PLC address after a screen change.
For example, if D0 is set as the [Write Screen Num] and the current screen on the TOP is No. 3, then the value 3 will be written to D0.
 
# Read Screen Num (HMI<-PLC)
This function reads a screen number from the specified PLC address and switches the HMI to that screen.
For example, if you write the value 7 to D8, the TOP HMI will read this value and switch to screen No. 7. 
After switching, it will also write 7 to the write address (e.g., D0) to reflect the current screen number.
 
is the problem solved? View More
Q.
[R Product] How can I switch between uppercase and lowercase letters on the English keyboard?
Function/Development
A.

You can use the uppercase/lowercase keyboard available in the [User Library].

By pressing the Caps Lock button, you can switch between uppercase and lowercase letters.
The Caps Lock functions as a toggle switch that turns a specific bit in the internal address ON/OFF.
Depending on the ON/OFF status of that bit, the system is designed to switch between uppercase and lowercase input accordingly.
is the problem solved? View More
Q.
Can I get sample project files for the [R Product]?
Service
A.
1. Feature-specific sample project files can be downloaded from the website via
    [Service] - [Download] - [Manual/Design] - [Sample Resources] board.

2. In TOP Design Studio, you can register various samples to the screen through the [User Library] docking window.
   If the User Library is not visible in the right docking window, go to [View] - [User Library] to make it appear.
 
   The User Library docking window is located on the right side of the screen.
 
   You can pin it by clicking the pushpin icon at the top-right corner to keep it fixed.
 
   The User Library contains a variety of sample resources categorized into [Parts] and [Screens].
  - [Parts] can be added to a screen by simply dragging and dropping them, as shown in the image above.
  - [Screens] can be registered by dragging and dropping them into either the [Main Screen] or [Window Screen] under [Project Manager], which will create and add a new screen.

3. Design samples can be downloaded from the  [Service] - [Download] - [Manual/Design] - [Design Resources] board on the website.
Let me know if you'd like a more formal or concise version.
is the problem solved? View More
1 2 3 4 5

This site is not supported by the current browser. Please download and use another browser below.